Visual AI Projects
With Visual AI, DataRobot allows you to use image data for modeling. You can create projects with one or multiple image features and also mix them with other DataRobot-supported feature types. You can find more information about Visual AI in the Platform documentation.
Create a Visual AI Project
DataRobot offers you different ways to prepare your dataset and to start a Visual AI project. The various ways to do this are covered in detail in the documentation, Preparing the dataset.
For the examples given here the images are partitioned into named directories. In the following, images are partitioned into named directories, which serve as labels for the project. For example, to predict on images of cat and dog breeds, labels could be abyssinian, american_bulldog, etc.
/home/user/data/imagedataset
    ├── abyssinian
    │   ├── abyssinian01.jpg
    │   ├── abyssinian02.jpg
    │   ├── …
    ├── american_bulldog
    │   ├── american_bulldog01.jpg
    │   ├── american_bulldog02.jpg
    │   ├── …
You then compress the directory containing the named directories into a ZIP file, creating the dataset used for the project.
from datarobot.models import Project, Dataset
dataset = Dataset.create_from_file(file_path='/home/user/data/imagedataset.zip')
project = Project.create_from_dataset(dataset.id, project_name='My Image Project')
Target
Since this example uses named directories the target name must be
class, which will contain the name of each directory in the ZIP
file.
Other Parameters
Setting modeling parameters, such as partitioning method, queue mode, etc, functions in the same way as starting a non-image project.
Start Modeling
Once you have set modeling parameters, use the following code snippet to specify parameters and start the modeling process.
from datarobot import AUTOPILOT_MODE
project.set_target(target='class', mode=AUTOPILOT_MODE.QUICK)
You can also pass optional parameters to project.set_target
to change aspects of the modeling process. Some of those parameters
include:
worker_count– int, sets the number of workers used for modeling.partitioning_method–PartitioningMethodobject.
For a full reference of available parameters, see
Project.set_target.
You can use the mode parameter to set the Autopilot mode.
AUTOPILOT_MODE.FULL_AUTO, is the default, triggers modeling
with no further actions necessary. Other accepted modes include
AUTOPILOT_MODE.MANUAL for manual mode (choose your own models to run
rather than running the full Autopilot) and AUTOPILOT_MODE.QUICK to
run on a more limited set of models and get insights more quickly
(“quick run”).
Interact with a Visual AI Project
The following code snippets may be used to access Visual AI images and insights.
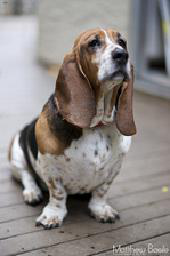
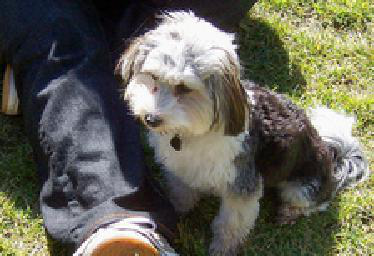
List Sample Images
Sample images allow you to see a subset of images, chosen by DataRobot,
in the dataset. The returned SampleImage objects have an associated
target_value that will allow you to categorize the images (abyssinian, american_bulldog, etc).
Until you set the target and EDA2 has finished, the target_value will be None.
import io
import PIL.Image

from datarobot.models.visualai import SampleImage

column_name = "image"
number_of_images_to_show = 5

for sample in SampleImage.list(project.id, column_name)[:number_of_images_to_show]:
    # Display the image in the GUI
    bio = io.BytesIO(sample.image.image_bytes)
    img = PIL.Image.open(bio)
    img.show()
The results would be images such as:
List Duplicate Images
Duplicate images, images with different names but are determined by DataRobot to be the same, may exist in a dataset. If this happens, the code returns one of the images and the number of times it occurs in the dataset.
from datarobot.models.visualai import DuplicateImage

column_name = "image"

for duplicate in DuplicateImage.list(project.id, column_name):
    # To show an image see the previous sample image example
    print(f"Image id = {duplicate.image.id} has {duplicate.count} duplicates")
Activation Maps
Activation maps are overlaid on the images to show which image areas are driving model prediction decisions.
Detailed explanations are available in DataRobot Platform documentation, Model insights.
Compute Activation Maps
To begin, you must first compute activation maps. The following snippet is an example of starting
the computation for a Keras model in a Visual AI project. The compute method returns a URL that
can be used to determine when the computation completes.
from datarobot.models.visualai import ImageActivationMap

keras_model = project.get_models(search_params={'name': 'Keras'})[0]

status_url = ImageActivationMap.compute(project.id, keras_model.id)
print(status_url)
List Activation Maps
After activation maps are computed, you can download them from the DataRobot server. The following snippet is an example of how to get the activation maps and how to plot them.
import PIL.Image
from datarobot.models.visualai import ImageActivationMap

column_name = "image"
max_activation_maps = 5
keras_model = project.get_models(search_params={'name': 'Keras'})[0]

for activation_map in ImageActivationMap.list(project.id, keras_model.id, column_name)[:max_activation_maps]:
    bio = io.BytesIO(activation_map.overlay_image.image_bytes)
    img = PIL.Image.open(bio)
    img.show()

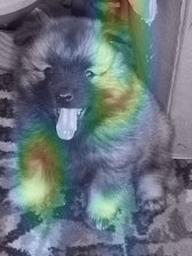
Image Embeddings
Image embeddings allow you to get an impression on how similar two images look to a featurizer network. The embeddings project images from their high-dimensional feature space onto a 2D plane. The closer the images appear in this plane, the more similar they look to the featurizer.
Detailed explanations are available in the DataRobot Platform documentation, Model insights.
Compute Image Embeddings
You must compute image embeddings before retrieving. The following snippet
is an example of starting the computation for a Keras model in our Visual AI project. The
compute method returns a URL that can be used to determine when the computation is complete.
from datarobot.models.visualai import ImageEmbedding

keras_model = project.get_models(search_params={'name': 'Keras'})[0]

status_url = ImageEmbedding.compute(project.id, keras_model.id)
print(status_url)
List Image Embeddings
After image embeddings are computed, you can download them from the DataRobot server. The following snippet is an example of how to get the embeddings for a model and plot them.
from matplotlib.offsetbox import OffsetImage, AnnotationBbox
import matplotlib.pyplot as plt
import numpy as np
import PIL.Image

from datarobot.models.visualai import ImageEmbedding

column_name = "image"
keras_model = project.get_models(search_params={'name': 'Keras'})[0]
zoom = 0.15

fig, ax = plt.subplots(figsize=(15,10))
for image_embedding in ImageEmbedding.list(project.id, keras_model.id, column_name):
    image_bytes = image_embedding.image.image_bytes
    x_position = image_embedding.position_x
    y_position = image_embedding.position_y
    image = PIL.Image.open(io.BytesIO(image_bytes))
    offset_image = OffsetImage(np.array(image), zoom=zoom)
    annotation_box = AnnotationBbox(offset_image, (x_position, y_position), xycoords='data', frameon=False)
    ax.add_artist(annotation_box)
    ax.update_datalim([(x_position, y_position)])
ax.autoscale()
ax.grid(True)
fig.show()
Image Augmentation
Image Augmentation is a processing step in the DataRobot blueprint that creates new images for training by randomly transforming existing images, thereby increasing the size of (i.e., “augmenting”) the training data.
Detailed explanations are available in the DataRobot Platform documentation, Creating augmented models.
Create Image Augmentation List
To create image augmentation samples, you need to provide an image augmentation list. This list holds all information required to compute image augmentation samples. The following snippet shows how to create an image augmentation list. It is then used to compute image augmentation samples.
from datarobot.models.visualai import ImageAugmentationList

blur_param = {"name": "maximum_filter_size", "currentValue": 10}
blur = {"name": "blur", "params": [blur_param]}
flip = {"name": "horizontal_flip", "params": []}

image_augmentation_list = ImageAugmentationList.create(
    name="my blur and flip augmentation list",
    project_id=project.id,
    feature_name="image",
    transformation_probability=0.5,
    number_of_new_images=5,
    transformations=[blur, flip],
)

print(image_augmentation_list)
Compute and Retrieve Image Augmentation Samples
You must compute image augmentation samples before retrieving. To compute image augmentation sample, you will need an image augmentation list. This list holds all parameters and transformation information needed to compute samples. You can either create a new one or retrieve an existing one.
The following snippet is an example of computing and retrieving image augmentation samples. It
uses the previous snippet that creates an image augmentation list, but instead uses it to compute and
retrieve image augmentation samples using the compute_samples method.
from datarobot.models.visualai import ImageAugmentationList, ImageAugmentationSample

blur_param = {"name": "maximum_filter_size", "currentValue": 10}
blur = {"name": "blur", "params": [blur_param]}
flip = {"name": "horizontal_flip", "params": []}

image_augmentation_list = ImageAugmentationList.create(
    name="blur and flip",
    project_id=project.id,
    feature_name="image",
    transformation_probability=0.5,
    number_of_new_images=5,
    transformations=[blur, flip],
)

for sample in image_augmentation_list.compute_samples():
     # Display the image in popup widows
     bio = io.BytesIO(sample.image.image_bytes)
     img = PIL.Image.open(bio)
     img.show()
List Image Augmentation Samples
If image augmentation samples were already computed instead of recomputing them we can retrieve the last sample that was computed for image augmentation list from DataRobot server. The following snippet is an example of how to get the image augmentation samples.
import io
import PIL.Image
from datarobot.models.visualai import ImageAugmentationList

image_augmentation_list = ImageAugmentationList.get('<image_augmentation_list_id>')

for sample in image_augmentation_list.retrieve_samples():
    # Display the image in popup widows
    bio = io.BytesIO(sample.image.image_bytes)
    img = PIL.Image.open(bio)
    img.show()
Configure Augmentations to Use During Training
In order to automatically augment a dataset during training the DataRobot server will look for an augmentation list associated with the project that has the key initial_list set to True. An augmentation list like this can be created with the following code snippet. If it is created for the project before autopilot is started. it will be used to automatically augment the images in the training dataset.
from datarobot.models.visualai import ImageAugmentationList

blur_param = {"name": "maximum_filter_size", "currentValue": 10}
blur = {"name": "blur", "params": [blur_param]}
flip = {"name": "horizontal_flip", "params": []}
transforms_to_apply = ImageAugmentationList.create(name="blur and scale", project_id=project.id,
    feature_name='image', transformation_probability=0.5, number_of_new_images=5,
    transformations=[blur, flip], initial_list=True)
Determine Available Transformations for Augmentations
The Augmentation List in the example above supports horizontal flip and blur transformations, but DataRobot supports several other transformations. To retrieve the list of supported transformations use the ImageAugmentationOptions object as the example below shows.
from datarobot.models.visualai import ImageAugmentationOptions
options = ImageAugmentationOptions.get(project.id)
License
For the examples here we used the The Oxford-IIIT Pet Dataset licensed under Creative Commons Attribution-ShareAlike 4.0 International License